Automatically Process and Send Google Form Responses on Submission
- Matt Zaske
- April 08, 2024
- 8 minutes
I haven't written anything up about Google stuff in a while, and since this topic came up a few times in as many weeks (including from conversations at BrainStorm K20) I figured it's time to share the solution I've used several times.
The Problem
I love Google Forms. They're easy to use and generally hit the right notes for processes. While they can neatly summarize data and provide useful graphics, something I used a lot in my president of the community theatre days, they are pretty colossally bad when it comes to submission notifications or sending the data submitted (to a team, for example).
There are ways to deal with this by doing stuff like creating a subscription for new responses in the destination spreadsheet, but even then you only receive a notice of a submission/change, not actually the details of such a change. If you want the details, you have to look in the form's responses UI (boo), the data sheet associated with the form (also boo), or...
Look to Google Apps Script
Apps Script is a great and relatively straightforward way to Do Things with the data captured in a form submission! Apps Script can be used to collect, format, transform, or send data to individuals, groups, or even do things in drive shares. For illustrative purposes, I'm breaking this down into two distinct tasks, but they are not mutually exclusive—you can mix and match (and/or expand) to your needs!
These illustrations assume you have an existing Google Form set up with an associated Response Sheet. From the Extensions menu of the response sheet, select "Apps Script" to jump into a new project.
1. Send a basic email with form data
In this example, we're just going to send a plain email with the submission data to a recipient. You'll create a function in Apps Script similar to this:
function emailFormResponse() {
	var emailSubject = 'Awesome Form Submission';
	var recipients = 'user@domain.com'; // can be comma-delimited for multiple recipients
	var ss = SpreadsheetApp.getActive().getSheetByName("SheetTabName");

	var lastRow = ss.getLastRow();
	var lastCol = ss.getLastColumn();
	var headerData = ss.getSheetValues(1,1,1,lastCol)[0];
	var formData = ss.getSheetValues(lastRow,1,1,lastCol)[0];
	var messageBody = '';
	for(var i = 0; i < lastCol; i++) {
		messageBody += headerData[i] + ': ' + formData[i] + '\n';
	}
	MailApp.sendEmail(recipients, emailSubject, messageBody);
}
When triggered (more about that in a bit), this will capture the most recent submission and dynamically create a no-frills email of the responses to each form prompt in this basic format (one line per question/prompt):
question: user response
What I like about this option
It's super dynamic! You set three variables (subject, recipient(s), and the tab/sheet name of responses), and the rest Just Works without having to figure out column counts, etc.
What I dislike about this option
No frills utilitarian look that just sends an email. This is fine if it's really just for a notification, but "Pretty Matters" if you're using this among a team or more than just yourself.
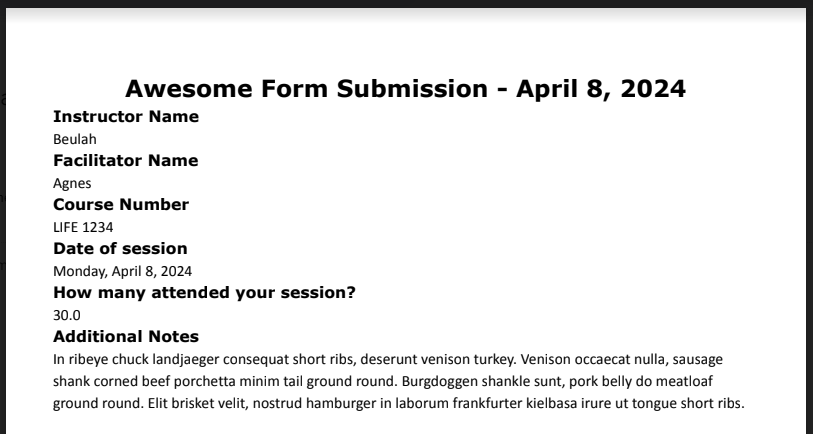
2. Create and send a "merged" document with form data
In this example, we're going to generate a "mail merged" Google doc with the submission data, drop it in a Shared Drive location, and email a PDF copy of the resulting file to a recipient. You'll create two functions in Apps Script:
function emailFormResponse() {
	var driveLocationID = 'stringidofgoogledriveid-or-stringidofgoogledrivefolderid';
	var recipients = 'user@domain.com';
	var ss = SpreadsheetApp.getActive().getSheetByName("SheetTabName");
	var docTitlePrefix = 'Awesome Form Submission - ';
	var dateFieldIndex = 3;

	var lastRow = ss.getLastRow();
	var lastCol = ss.getLastColumn();
	var headerData = ss.getSheetValues(1,1,1,lastCol)[0];
	var formData = ss.getSheetValues(lastRow,1,1,lastCol)[0];

	// Generate a dynamic document title:
	var titleDate = Utilities.formatDate(formData[dateFieldIndex], "CST", "MMMM d, yyyy");
	var docTitle = docTitlePrefix + titleDate;

	// Generate document
	generateDocument(docTitle, headerData, formData, lastCol, dateFieldIndex, recipients, driveLocationID);
}
The above (first) function is where we set our variables and prepare to create a Google doc. Most of this is similar to the code in method #1, including how it would be triggered, but this time around we create a dynamic document title/name with a neatly formatted "date" field that is field/input #4 of the form response (hence the reference to dateFieldIndex = 3 in the variable declaration).
This prepared information is then fed to a second function that handles the document creation and sending:
function generateDocument(docTitle, headerData, formData, colCount, specialFieldNum, recipients, sharedDriveID) {
	var doc = DocumentApp.create(docTitle);

	// Set basic body styles
	var body = doc.getBody();
	var headerStyle = {};
	headerStyle[DocumentApp.Attribute.FONT_FAMILY] = 'Verdana';
	headerStyle[DocumentApp.Attribute.FONT_SIZE] = 18;
	headerStyle[DocumentApp.Attribute.BOLD] = true;
	var parQuestionStyle = {};
	parQuestionStyle[DocumentApp.Attribute.FONT_FAMILY] = 'Verdana';
	parQuestionStyle[DocumentApp.Attribute.FONT_SIZE] = 12;
	parQuestionStyle[DocumentApp.Attribute.BOLD] = true;
	var parResponseStyle = {};
	parResponseStyle[DocumentApp.Attribute.FONT_FAMILY] = 'Calibri';
	parResponseStyle[DocumentApp.Attribute.FONT_SIZE] = 12;
	parResponseStyle[DocumentApp.Attribute.BOLD] = false;

	// Create document text and format accordingly
	var headerPar = body.appendParagraph(docTitle)
	headerPar.setAlignment(DocumentApp.HorizontalAlignment.CENTER);
	headerPar.setAttributes(headerStyle);
	for(var i = 0; i < colCount; i++) {
		var leadPar = body.appendParagraph(headerData[i]);
		leadPar.setAttributes(parQuestionStyle);
		if (i == specialFieldNum) {
			var dataPar = body.appendParagraph(Utilities.formatDate(formData[i], "CST", "EEEE, MMMM d, yyyy"));
		} else {
			var dataPar = body.appendParagraph(formData[i]);
		}
		dataPar.setAttributes(parResponseStyle);
	}

	// Move the document to folder/Shared Drive, save, and close
	var docFile = DriveApp.getFileById(doc.getId());
	var destinationFolder = DriveApp.getFolderById(sharedDriveID);
	docFile.moveTo(destinationFolder);
	doc.saveAndClose()

	// Send PDF of the document
	MailApp.sendEmail(recipients, 'Form Sumission Notification: ' + docTitle, 'The form submission summary is attached.', { attachments: [docFile.getAs(MimeType.PDF)] });
}
The first third of the second function handles document formatting and styles; the second third actually builds out the document structure and content (iterating over paragraphs just like what happened in method #1); the last third moves the Google doc to a destination share/folder and subsequently emails a PDF version of the generated document to the recipients specified.
I "cheated" a bit on this one as it relates to the date formatting. I wanted to keep the example of how to handle the date data differently than normal string data, so I added an argument to the generateDocument function specifically to identify the field which is then logically addressed in the document generation with the little if statement: if (i == specialFieldNum). There's a better way to handle this for a system at larger scale, but for the purposes of the example I made it work "quick and dirty."
The result: a PDF that looks like the headline photo of this post!
What I like about this option
It's super customizable, recipient friendly, and looks pretty! Again, you set a few variables and the rest Just Works!
What I dislike about this option
There's a more significant upfront "lift" for making this work. It also creates a Google doc in the process which can clutter up things if you're not deliberate about how those will be managed and handled long-term. It requires a little more thoughtfulness about the problem you're solving.
Triggering your New Creation(s)
Both of these methods are great and useful, and they both leverage Apps Script attached to a sheet of form responses. The last step in making either of these "work" is setting up the Apps Script Trigger. In the Apps Script interface, on the left-hand side is an alarm clock-looking icon that, if you hover over it, will expand the menu to show you "Triggers"—use that to jump into the Triggers screen.
You can add a number of types of Trigger for different use cases; since we're just running when a form is submitted, it's pretty straightforward:

Both options had the main function name of emailFormResponse; use that as the function to run. You will set the event source to From spreadsheet and the event type to On form submit. There are also options for notification of failures that you can set as you see fit. Close out the dialog and you should have a freshly-minted Trigger for your new creation!
A Note About Permissions
Before you submit a form response, you'll need to give it a test run via Apps Script to set up permissions for your account. In the code editor this can be done by using the Run or Debug buttons in the ribbon once you've selected the emailFormResponse function. This is generally a one-time action/approval, and the first time you'll be prompted to allow the Apps Script to access and use your account to do the things like send email and create documents. This is only necessary for the person/account from which the documents will be generated/managed/emailed (not users submitting the form), but something you will need to do before giving the form a "first production run."
Once permissions have been granted, filling out a form response should trigger the process you created and you'll have data at hand, served by email!
Apps Script: Great for Simple and Effective Automations
This process might seem and feel super intimidating, but that's why I generally recommend folks start with the "easier/simpler" option first (method #1 in this post) and grow into the more complex options as you need (method #2). The possibilities are many—good luck!
Recent Posts
Past Speaking Engagements
I was a speaker at MMSMOA, May 3-7, 2026!
I was a speaker at MMS Music City Edition, October 12-15, 2025!

I was a speaker at TCSMUG Autopilot/OSD Day, July 15, 2025!
![]()
I was a speaker at MMSMOA, May 4-8, 2025!
I was a speaker at BrainStorm K20 Wisconsin Dells, March 9-11, 2025!

I was a speaker at MMS Flamingo Edition, October 20-23, 2024!

I was a speaker at TCSMUG OSD Day, July 31, 2024!
![]()
I was a speaker at NWSCUG, July 19, 2024!
![]()
I was a speaker at MMSMOA, May 5-9, 2024!
I was a speaker at BrainStorm K20 Wisconsin Dells, March 10-12, 2024!
I was a speaker at MMS Miami Beach, October 29-November 1, 2023