Using Powershell to Send a Teams Notification from a Task Sequence Step
- Matt Zaske
- November 18, 2024
- 8 minutes
The last two posts were inspired by conversations at MMS Flamingo and focus on using Slack as the communication/receiver for notices relayed from a Task Sequence step and directly from a Task Sequence step. Based on some of the responses I've seen, I thought I'd give my hand at applying the same direct logic to send the same sort of notification to a Teams channel instead.
Why Teams?
I have very little experience with Teams beyond what I've done in my developer tenant and some random meetings, and I had not yet used a webhook for Teams so it seemed like a good thing to fiddle with one weekend to see how things are similar, different, and ultimately provide a stubout for folks to use if Teams is their ecosystem.
The Similarities
Mechanically speaking, the process is basically the same once things are set up. A powershell script is triggered/run from a Task Sequence step, it crafts the webhook payload, and using Invoke-RestMethod submits to the webhook endpoint. While that's cool, it's also where the similarities end.
The Differences
Oof. There are many. To my mind, and based on this little exercise, Slack webhooks are substantially simpler, easier to structure/format, and are pretty forgiving. Teams webhooks, on the other hand, are pretty cumbersome, more restrictive in their format, and awfully difficult to troubleshoot. That being said, it appears that almost any user could create their own Teams webhook whereas in Slack it requires a different level of access/app integration.
I am not going to get into the details of creating webhooks for Teams beyond this: I am using the "new" webhook style (workflow) and not the deprecated and soon-to-be-going-away Office connector style webhooks. From what I read/understand, the "older" type of webhook was likely a lot simpler and more forgiving.
Bummer #1: The Structure/Format
Microsoft has some reasonable documentation to help get started creating/sending messages. It's a good starting point and identifies a couple ways to Make Things Happen. However, if you want to format the response (as we need to do), you must use Adaptive Cards, the loose equivalent of Slack's Block Kit. There's a sentence in the documentation indicating the simpler message card format might be available in the future.
Markdown isn't really supported in a meaningful way either beyond bold/italic, lists, and links, including preformatted text. In lieu of the lack for preformatted text, I changed the font style. Microsoft provides some pointers to get started with formatting cards.
That said, there's a pretty decent visual Adaptive Card designer tool that can create the structure payload for your notification. I pulled the text and variables from a previous Slack notification and dropped the text directly into the designer so I could have a more 1:1 comparison as I built out the layout.
Bummer #2: Emoji Are Seriously Limited
According to the Internet, this seems to be Teams webhook specific, but much of today's common emoji aren't supported in the adaptive card payload for Teams. What that means is much testing will be necessary to determine if/which emoji can be used in the notification. As a starting point, using a chart (though it's out of date) is a decent way to test the waters for possibly supported emoji.
When using emoji, you must use the hex code for each, in the format of ℹ (for the information block) where &#x is fixed, and 2139 is the trailing four digits of the Unicode string. Now technically the leading x represents a zero in the hex code string, but here's where things seem to get super limited. Most of the emoji Unicode with five characters or in the 10000+ range (necessitating a leading 1 instead of x) simply don't work in the payload. Your mileage may vary, but I found it to be a major bummer.
A workaround for this limitation would be to host and link to your own emoji/images for the notification, which you would instead include as an image instead of hex code.
Something Cool: Font Controls
One of the things I found neat about the adaptive card design, though, is the ability to use a small number of font and style controls (size, weight, color, monospace, and basic alignment). It's not exhaustive, but was a way to work around the missing markdown.
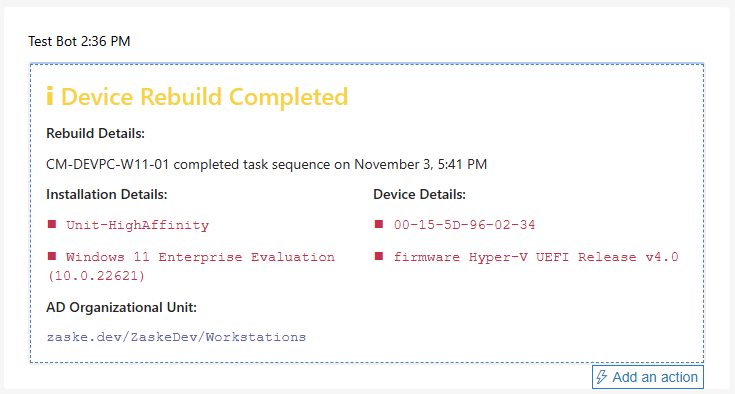
Design considerations in place, I was able to generate this concept in the designer tool:
The Payload
Using adaptive cards, the payload gets pretty gnarly pretty quickly. Whereas the equivalent Slack payload only required a ConvertTo-Json -Depth of 4, the adaptive card payload required me to use a -Depth value of 9 for the same style of output. The script is also substantially longer for this layout, clocking in around 120 lines (nicely formatted) for the Teams payload versus around 40 for the Slack payload.
The Script
I have this script (Submit-DirectTeamsNotification.ps1) in the starter repo as well, but here it is directly:
$deviceName = hostname
$teamsWebhookURL = 'https://fqdn/you/get/when/setting/up/a/teams/webhook/workflow';
$formattedDateTime = (Get-Date).ToString("MMMM d, h:mm tt")
# Task Sequence Variables
$tsenv = New-Object -COMObject Microsoft.SMS.TSEnvironment
# These variables are globally available
$MACAddress = (Get-NetAdapter | Where-Object Status -eq "Up").MacAddress
$OSInfo = (Get-ComputerInfo | Select-Object OsName, OsVersion)
$OSData = ($OSInfo.OsName -replace "Microsoft ", "") + " (" + $OSInfo.OsVersion + ")"
if ($MACAddress.Count -gt 1) {
  $MAC = $MACAddress[0]
} else {
  $MAC = $MACAddress
}
# These variables are custom and will be empty unless your TS declares/sets them
$InstallType = $tsenv.Value("InstallType")
$OSDOUCN = $tsenv.Value("OSDOUCN")
$FirmwareRev = $tsenv.Value("OSDDeviceFirmwareVersion")
# Create the Header block
$headerBlock = @{
  type = "TextBlock"
  text = "ℹ Device Rebuild Completed"
  wrap = $true
  size = "ExtraLarge"
  weight = "Bolder"
  style = "heading"
  color = "Warning"
}
# Create the Rebuild Details block
$rebuildDetailsBlock = @{
  type = "Container"
  items = @(
    @{
      type = "TextBlock"
      text = "Rebuild Details:"
      wrap = $true
      weight = "Bolder"
    }
    @{
      type = "TextBlock"
      text = "$deviceName completed task sequence on $formattedDateTime"
      wrap = $true
    }
  )
}
# Create the Installation Details column
$installationDetailsColumn = @{
  type = "Column"
  width = "stretch"
  items = @(
    @{
      type = "TextBlock"
      text = "Installation Details:"
      wrap = $true
      weight = "Bolder"
      style = "columnHeader"
    }
    @{
      type = "TextBlock"
      text = "◼ $InstallType`n`n◼ $OSData"
      wrap = $true
      fontType = "Monospace"
      color = "Attention"
    }
  )
}
# Create the Device Details column
$deviceDetailsColumn = @{
  type = "Column"
  width = "stretch"
  items = @(
    @{
      type = "TextBlock"
      text = "Device Details:"
      wrap = $true
      weight = "Bolder"
      style = "columnHeader"
    }
    @{
      type = "TextBlock"
      text = "◼ $MAC`n`n◼ firmware $FirmwareRev"
      wrap = $true
      fontType = "Monospace"
      color = "Attention"
    }
  )
}
# Create the AD OU block
$adOuBlock = @{
  type = "Container"
  items = @(
    @{
      type = "TextBlock"
      text = "AD Organizational Unit:"
      wrap = $true
      weight = "Bolder"
      style = "columnHeader"
    }
    @{
      type = "TextBlock"
      text = $OSDOUCN
      wrap = $true
      fontType = "Monospace"
      color = "Accent"
    }
  )
}
# Create the card body layout/content
$cardBodyContent = @(
  # Header
  $headerBlock
  # Rebuild Details
  $rebuildDetailsBlock
  # Columns
  @{
    type = "ColumnSet"
    columns = @(
      # Installation Details
      $installationDetailsColumn
      # Device Details
      $deviceDetailsColumn
    )
  }
  # AD OU
  $adOuBlock
)
# Create the post data payload
$payloadData = @{
  type = "message"
  attachments = @(
    @{
      contentType = "application/vnd.microsoft.card.adaptive"
      contentUrl = $null
      content = @{
        type = "AdaptiveCard"
        '$schema' = "http://adaptivecards.io/schemas/adaptive-card.json"
        version = "1.5"
        body = $cardBodyContent
      }
    }
  )
}
# Convert the payload to JSON (recursively)
$jsonPayload = $payloadData | ConvertTo-Json -Depth 9
# Create Headers
$headers = @{"Content-Type" = "application/json"}
# Parameter Hashtable
$Params = @{
  Uri = $teamsWebhookURL
  Method = "Post"
  Headers = $headers
  Body = $jsonPayload
}
# Submit!
$response = Invoke-RestMethod @Params
$response | ConvertTo-Json
For illustrative purposes, I used separate variables for the structure to help sort out what was (or goes) where, but that's not required. It could all be stitched into one giant payload variable if that were necessary. It quickly becomes difficult to parse/read, though.
Something to note about the output of this script: if successful there will be no JSON data. It'll return a HTTP 202 code if the payload was accepted, and that's all.
The Result
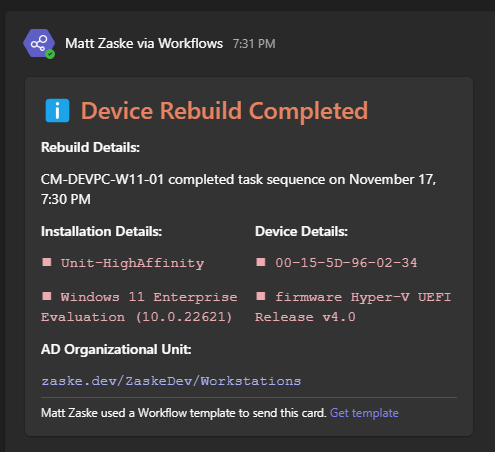
It's honestly not bad to look at in Teams!

Webhooks Are Cool!
With this post, I've illustrated how to send a webhook payload to two different services (Slack and Teams), but as I noted for this Teams journey with a little fiddling the same concepts can be applied to many webhook services. Hopefully you're inspired to either steal this with pride or try your own new adventure! Good luck!
