Going Dual Camera with OctoPrint
- Matt Zaske
- March 13, 2023
- 6 minutes
Almost as soon as I started using OctoPrint, I also set up an old webcam to let me remotely "see" things since I keep the printer in the basement. That whole process was an adventure, because I don't use a Raspberry Pi for OctoPrint like most folks; I have an old Intel NUC (also used as a local dev server) running Ubuntu on which I installed OctoPrint. To that end, I had to do some manual install/build of the mjpg-streamer, specifically I used this package to get started. There were other dependencies and such I had to install to get it working, all of which is a bit out of scope for this post.
Once I got that all set up, eventually I printed a mount arm for my super old camera that's attached to the X axis gantry. This has been working well for some time, and works sufficiently for basic timelapses, but I also missed my "top view" camera position I used before printing the camera mount. And that called for finding another old camera and giving a dual-camera setup a go.
Camera Obtained; Time to Roll
In order to get my original camera behaving properly, I had to "hack" the mjpg-streamer script to work in my environment. For some reason the arguments weren't being passed as expected so I hardcoded them into the daemon script I'd built out. This was first an opportunity to clean up the mess, so I started with this:
#!/bin/bash
MJPGSTREAMER_HOME=/path/to/mjpg-streamer/mjpg-streamer-experimental

# init configuration
camera="auto"

# runs MJPG Streamer, using the provided input plugin + configuration
function runCamera {
    pushd $MJPGSTREAMER_HOME
    echo Running ./mjpg_streamer -o "output_http.so -w ./www" -i "input_uvc.so"
    LD_LIBRARY_PATH=. ./mjpg_streamer -o "./output_http.so -w ./www -p 8080" -i "./input_uvc.so -r 640x480 -f 10 -d /dev/v4l/by-id/usb-old-camera-id-number-video-index0"
    popd
}

# starts up the USB webcam
function startUsb {
    logger "Starting USB webcams"
    runCamera
}

# keep mjpg streamer running if some camera is attached
while true; do
    if [ -e "/dev/v4l/by-id/usb-old-camera-id-number-video-index0" ] && { [ "$camera" = "auto" ] || [ "$camera" = "usb" ] ; }; then
        startUsb
    fi
    sleep 120
done
Adding the Second Camera
Once I plugged in the new camera, it shows up in /dev/v4l/by-id and I can grab the "video0" path. I can then add a second function in a modified version of the aforementioned script, which I call webcamDaemon2 to be safe and specific (and provide a failsafe for the original configuration):
#!/bin/bash
MJPGSTREAMER_HOME=/path/to/mjpg-streamer/mjpg-streamer-experimental

# init configuration
camera="auto"

# runs MJPG Streamer, using the provided input plugin + configuration
function runCameraOne {
    pushd $MJPGSTREAMER_HOME
    echo Running ./mjpg_streamer -o "output_http.so -w ./www -p 8080" -i "input_uvc.so (bed camera)"
    LD_LIBRARY_PATH=. ./mjpg_streamer -o "./output_http.so -w ./www -p 8080" -i "./input_uvc.so -r 640x480 -f 10 -d /dev/v4l/by-id/usb-old-camera-id-number-video-index0"
    popd
}

function runCameraTwo {
    pushd $MJPGSTREAMER_HOME
    echo Running ./mjpg_streamer -o "output_http.so -w ./www -p 8081" -i "input_uvc.so (top camera)"
    LD_LIBRARY_PATH=. ./mjpg_streamer -o "./output_http.so -w ./www -p 8081" -i "./input_uvc.so -r 1280x720 -f 10 -d /dev/v4l/by-id/usb-second-camera-id-number-video-index0"
    popd
}

# starts up the USB webcam
function startUsb {
    logger "Starting USB webcams"
    runCameraOne&
    runCameraTwo
}

# keep mjpg streamer running if some camera is attached
while true; do
    if [ -e "/dev/v4l/by-id/usb-old-camera-id-number-video-index0" ] && { [ "$camera" = "auto" ] || [ "$camera" = "usb" ] ; }; then
        startUsb
    fi
    sleep 120
done
A couple of important things to note on this relatively minor change:
- The
runCameraTwofunction specifies the "second" camera on the system, and also uses port 8081 (see the-p 8081declaration) and also has a much higher resolution than the original camera (it's 720p so its resolution can be set to-r 1280x720). - The
startUsbfunction has to call both functions separately but "simultaneously," so we use the&following the first camera call to handle this. Doing so has no effect on this when running as a service, and both cameras will start and stop as the service does.
I also have UFW enabled on this box, so I add port 8081 to the access list for local devices:
sudo ufw allow in proto tcp from 192.168.1.0/24 to any port 8081
Once this is done, manually running the webcamDaemon2 script indicates both cameras start with success, and checking both via a browser pointing at ports 8080 (for the original camera) and 8081 (for the second) show things are working as expected.
Updating the Service
Since I created a new execution script for both cameras, I have to update the webcamd.service I configured previously at /etc/systemd/system/:
[Unit]
Description=Camera streamer for OctoPrint
After=network-online.target OctoPrint.service
Wants=network-online.target

[Service]
Type=simple
User=usergoeshere
ExecStart=/path/to/scripts/webcamDaemon2
#ExecStart=/path/to/scripts/webcamDaemon

[Install]
WantedBy=multi-user.target
For simplicity and should I revert this at some point, I just commented out the "old" single-camera script. In order for this service to take effect, you have to reload the daemons:
sudo systemctl daemon-reload
At this point, running systemctl [status|start|stop] webcamd.service should show the status/start/stop the streaming service for both cameras (at port 8080 and 8081, respectively). It works great, which means the UI in OctoPrint will start both cameras without any adjustment:
● webcamd.service - Camera streamer for OctoPrint
     Loaded: loaded (/etc/systemd/system/webcamd.service; enabled; vendor preset: enabled)
     Active: active (running) since [timestamp]; [time elapsed] ago
   Main PID: 12345 (webcamDaemon2)
      Tasks: 10 (limit: 4417)
     Memory: 2.1M
        CPU: 115ms
     CGroup: /system.slice/webcamd.service
             ├─12345 /bin/bash /path/to/scripts/webcamDaemon2
             ├─12346 /bin/bash /path/to/scripts/webcamDaemon2
             ├─12347 ./mjpg_streamer -o "./output_http.so -w ./www -p 8081" -i "./input_uvc.so -r 1280x720 -f 10 -d /dev/v4l/by-id/usb-second-camera-id-number-video-index0"
             └─12348 ./mjpg_streamer -o "./output_http.so -w ./www -p 8080" -i "./input_uvc.so -r 640x480 -f 10 -d /dev/v4l/by-id/usb-old-camera-id-number-video-index0"
Back to OctoPrint
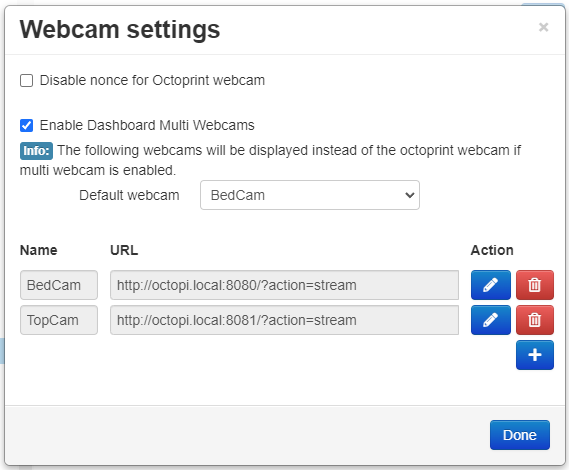
I already use the Dashboard plugin for OctoPrint, and it supports multiple webcam streams if enabled. I enabled both, which was relatively straightforward:
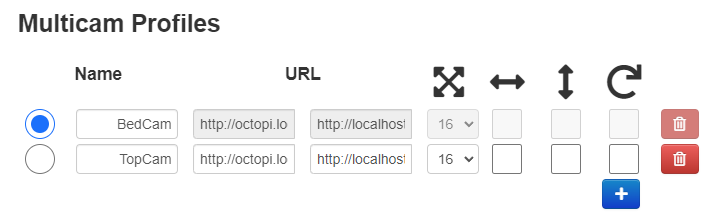
I also installed the MultiCam plugin in this process and configured both cameras for it. Under most use cases, my real go-to for monitoring in OctoPrint is the "Control" tab, and MultiCam provides a simple button to toggle between cameras right among the other controls.
All in all, the OctoPrint side of this change was pretty trivial, which was nice considering the complexities of setting up the streamer!
That Sounds Like a Lot of Effort
This was definitely a "nice to have" project for me. A second cheap webcam, though, made the difference. It'll be nice to have multiple angles to watch remotely during a given job. I didn't have the printer cranking out anything at the time of writing this post, so I don't have fun snapshots of what it actually looks like in the OctoPrint UI. But not having a job or project in the queue also afforded time to make this change!
All in all, it took me about an hour to clean up the old daemon script, figure out the nuances of adding the second camera and getting it to behave as a service with the original, and installing/configuring the MultiCam plugin. So it was some effort, but not nearly as overwhelming as getting the original camera to behave. And I have cleaner config files to boot now!
Recent Posts
Past Speaking Engagements
I was a speaker at MMSMOA, May 3-7, 2026!
I was a speaker at MMS Music City Edition, October 12-15, 2025!

I was a speaker at TCSMUG Autopilot/OSD Day, July 15, 2025!
![]()
I was a speaker at MMSMOA, May 4-8, 2025!
I was a speaker at BrainStorm K20 Wisconsin Dells, March 9-11, 2025!

I was a speaker at MMS Flamingo Edition, October 20-23, 2024!

I was a speaker at TCSMUG OSD Day, July 31, 2024!
![]()
I was a speaker at NWSCUG, July 19, 2024!
![]()
I was a speaker at MMSMOA, May 5-9, 2024!
I was a speaker at BrainStorm K20 Wisconsin Dells, March 10-12, 2024!
I was a speaker at MMS Miami Beach, October 29-November 1, 2023