Creating a Reference Sensor Template in Home Assistant
- Matt Zaske
- March 27, 2023
- 10 minutes
It's been a while since I wrote about any Home Assistant stuff so I figured this was as a good time to write about something I'm super happy with: custom/reference sensor templates!
What IS this Template Thing?
There's a lot of stuff you can get into with Home Assistant Templates to the point an entire chapter on Templating in Home Assistant (a great reference) is available, but it's super overwhelming at first...especially if you're not sure what you're looking for (or searching for) to accomplish a given task.
Tons of complex things can be done Templates; I was looking for a way to create a "reference" data point to use in other automations (or against which to compare values). It would be the "average" or some other computed value based on the values of other, real sensors. Turns out this is a perfect use case for a Template!
Where Do You Start?
I use the the File editor add-on for Home Assistant. This allows me to edit files through the Home Assistant web interface. Once in a while I directly edit files on the server, but File editor's features make editing easier...and also includes basic syntax checking and other stuff to make sure a wonky typo in your YAML doesn't cause unnecessary stress.
With that said, and having read up on this stuff and [somewhat] wrapping my head around it all, I took the advice to create my own "include" file for my Templates wherever possible. In theory if something barfed I wouldn't brick the entire HA ecosystem. To that end, I added a file in /config called mz-templates.yaml and used a simple include statement in my /config/configuration.yaml file:
template: !include mz-templates.yaml
Once I had a place to "put" my stuff, it was time to begin!
What Did You Try?
From reading I knew I needed to create a "sensor" that could in turn be referenced by the automations in scope.
My first sensor idea was a "Bathroom Humidity Target" to use in controlling (or overriding) a bathroom fan control. I'd installed a basic smart switch to control the bathroom fan, and it was integrated with Home Assistant. I wanted to create more nuanced control of when the fan would turn off. I didn't want to go by a straight time-based solution or a specific setpoint (more about that later), but something that would be based on the actual conditions in the house. This sort of sensor Template is fairly straightforward to create since its only output is the calculated value.
Additional Background and Device Information
In my Home Assistant setup, I have a generic Zigbee USB dongle that allows me to use Zigbee devices such as the reasonably-priced and long-lasting Aqara sensors. I have a ton of the temperature/humidity sensors around the house, one of which is in the bathroom in question. For the purpose of this post and for simplicity/clarity, I'm only referencing some of the main floor sensors, which is why some of the sensor names might be out of order/non-consecutive). To that end, these sensors could be swapped for any other sensor exposed in Home Assistant; there's nothing special about the Aqara line with regard to this post.
The First Template Sensor
My first Template sensor was something to display the humidity average across several actual sensors. I decided to start with this as a way to make sure my math/general logic was correct, before additional complexity like an expected range or how to deal with an offline sensor were inserted. Within my /config/mz-templates.yaml file, I added this:
  - sensor:
      - name: "Humidity Test"
        unique_id: "sensor.humidity_test"
        unit_of_measurement: "%"
        state: >
          {% set office = states('sensor.lumi_lumi_weather_humidity_2') %}
          {% set kitchen = states('sensor.lumi_lumi_weather_humidity_6') %}
          {% set livingroom = states('sensor.lumi_lumi_weather_humidity_7') %}
          {% set humiditysum = 0 %}
          {% set humiditysum = office | float | round(2) %}
          {% set humiditysum = humiditysum + kitchen | float | round(2) %}
          {% set humiditysum = humiditysum + livingroom | float | round(2) %}
          {{ (humiditysum / 3) | round(1) }}
        state_class: measurement
        device_class: humidity
This sensor is named "Humidity Test" with a similarly-named unique_id (which is used in everything else for Home Assistant). It has a unit_of_measurement, state_class and device_class to be classified and be human-readable as a humidity sensor.
The basic logic and its output is all classified in the state: setting. The final line in the state ({{ (humiditysum / numdevices) | round(1) }}) is what actually presents the value in the format we expect (e.g. 46.5). Since I have included three sensors, I divide the sum of their values explicitly by 3 to return the calculated average.
A Note on Developing and Testing Templates
The Home Assistant Developer Tools interface has a very convenient "Template" tab. This is a great place to play around with basic syntax, making sure you're getting real sensor values (that you expect), and so forth. It uses live data and doesn't require any configuration reloads or reboots. An excellent way to test!
The Second (and "Production") Template Sensor
Having something that worked was awesome; now I could work on something that addressed the nuance I wanted:
- I needed to set floor and ceiling values for the sensor to deal with wildly different environmental conditions over the course of a Minnesota year. It's super dry in midwinter, can be super humid in late summer, and all over the board during spring and fall periods when no central air conditioning or heating is running.
- I needed to deal with the situation of any offline sensors to preserve the quality of the average measurement value.
- I wanted to set the fan setpoint at 5.5% higher than the average across sensors (or the floor/ceiling value). This would deal with all the seasons and conditions and allow for getting the humidity down in the bathroom without solely relying on a time-based sensor.
Within my /config/mz-templates.yaml file, I added this:
  - sensor:
      - name: "Bathroom Humidity Target"
        unique_id: "sensor.bathroom_humidity_target"
        unit_of_measurement: "%"
        state: >
          {% set office = states('sensor.lumi_lumi_weather_humidity_2') %}
          {% set kitchen = states('sensor.lumi_lumi_weather_humidity_6') %}
          {% set livingroom = states('sensor.lumi_lumi_weather_humidity_7') %}
          {% set humiditysum = 0 %}
          {% set numdevices = 0 %}
          {% if is_number(office) %}
            {% set humiditysum = office | float | round(2) %}
            {% set numdevices = numdevices + 1 %}
          {% endif %}
          {% if is_number(kitchen) %}
            {% set humiditysum = humiditysum + kitchen | float | round(2) %}
            {% set numdevices = numdevices + 1 %}
          {% endif %}
          {% if is_number(livingroom) %}
            {% set humiditysum = humiditysum + livingroom | float | round(2) %}
            {% set numdevices = numdevices + 1 %}
          {% endif %}
          {% if numdevices > 0 %}
            {% set avghumidity = (humiditysum / numdevices) | round(1) %}
          {% else %}
            {% set avghumidity = 50 %}
          {% endif %}
          {% if avghumidity < 40 %}
            45
          {% elif avghumidity > 70 %}
            80
          {% else %}
            {{ avghumidity + 5.5 }}
          {% endif %}
        state_class: measurement
        device_class: humidity
This sensor is similar to the first Template sensor and has different name/unique_id values. Where is differs is in determining if a given source sensor is offline/unavailable, setting a default value if no sensor is available, handling the floor and ceiling range/values, and spitting out the calculated target.
The Aqara sensors in my Home Assistant configuration will not return a numeric value if they are not behaving. I was able to test this via the "States" tab of Home Assistant's Developer Tools. This means I could use the Template if logic of {% if is_number(kitchen) %} to only include sensors that are reporting with some numeric value (as expected/when working).
My floor and ceiling (range) values are 40 and 70 percent, respectively. If the average is below 40%, the target will always be set at 45%. This seemed reasonable for winter, as the heating system would disperse the remainder of the humidity without issue (and it wouldn't be "raining" in the bathroom). Similarly, if the average is above 70%, no central system is likely in operation (windows open, etc.), so we settle for an 80% target. Otherwise we use the average plus 5.5%.
I now had a completely working and dynamic reference/setpoint for the bathroom fan in question! I just needed to connect it to the various automations and let it go!
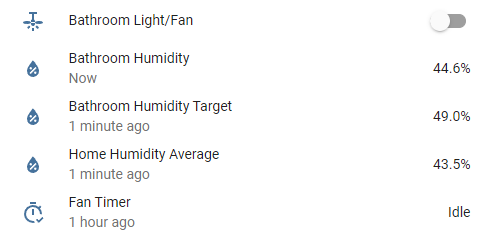
A Dashboard Example
This image shows how things would look when the device is off and things are in a normal state:
A Dynamic Auto-Off Example
I have an automation to turn off the fan automatically by the dynamic humidity target:
alias: Bathroom | Fan | Off (by Dynamic Humidity)
description: ""
trigger:
  - platform: numeric_state
    entity_id: sensor.lumi_lumi_weather_humidity
    below: sensor.bathroom_humidity_target
condition:
  - condition: device
    type: is_on
    device_id: ee123454bb529453ff4d0162a3b7a718
    entity_id: switch.bathroom_light_fan
    domain: switch
  - condition: state
    entity_id: timer.bathroom_fan_timer
    state: idle
action:
  - type: turn_off
    device_id: ee123454bb529453ff4d0162a3b7a718
    entity_id: switch.bathroom_light_fan
    domain: switch
mode: single
The important part to note is the trigger: section, in which the bathroom sensor (sensor.lumi_lumi_weather_humidity) must have a value below: that of my reference/target Template sensor (sensor.bathroom_humidity_target).
There are other conditions I've got in place (if the fan is on and if an associated timer is idle), and if those conditions match we switch off the fan. Voila!
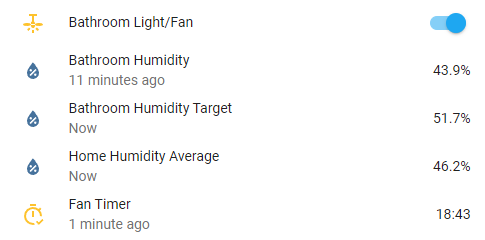
About The Timer
How the timer is created and managed is out of scope for this post, but relevant to briefly mention why a timer exists. It takes a few minutes for the humidity to rise in the use of the shower. Without a timer in place as the bathroom humidity sensor starts to climb it's still below the calculated average and would shut off the fan before the humidity rose sufficiently.
The timer also is in place to address situations where the humidity would not climb (other normal bathroom use). In this case the timer provides a failsafe to ensure there is enough initial humidity rise, but it exists for other automation purposes as well.
This image shows what the dashboard looks like within 90 seconds of starting the fan (and shower), but not long enough for the humidity level to rise above the target threshold. This is where the timer is most useful for the purposes of the automation:
A Bonus: Overriding the Offenders
Having this system in place also provides another benefit: overriding the poor choices of others. The rule in our house now is to leave the fan on and let it do its thing automatically. Folks don't turn it off manually anymore, but if they do...
It will correct this action if necessary.
I have an additional automation to restart the fan if it was prematurely shut off:
alias: Bathroom | Fan | Stays On (by Humidity)
description: ""
trigger:
  - platform: device
    type: turned_off
    device_id: ee123454bb529453ff4d0162a3b7a718
    entity_id: switch.bathroom_light_fan
    domain: switch
condition:
  - condition: numeric_state
    entity_id: sensor.lumi_lumi_weather_humidity
    above: sensor.bathroom_humidity_target
action:
  - type: turn_on
    device_id: ee123454bb529453ff4d0162a3b7a718
    entity_id: switch.bathroom_light_fan
    domain: switch
  - if:
      - condition: state
        entity_id: timer.bathroom_fan_timer
        state: idle
    then:
      - service: timer.start
        data: {}
        target:
          entity_id: timer.bathroom_fan_timer
mode: single
This automation is triggered when the fan is switched off and the humidity level is still above the desired setpoint. If this is the case, the fan will be turned back on and its timer reset.
It works great! And sometimes causes unnecessary cursing by folks who out of habit or some other choice turned off the fan.
What I really like about this entire setup is that I can ensure the bathroom exhaust fan runs long enough to sufficiently address the humidity, but not so long as to be wasteful. And it happens automatically, requiring no intervention. Home Assistant for the win!
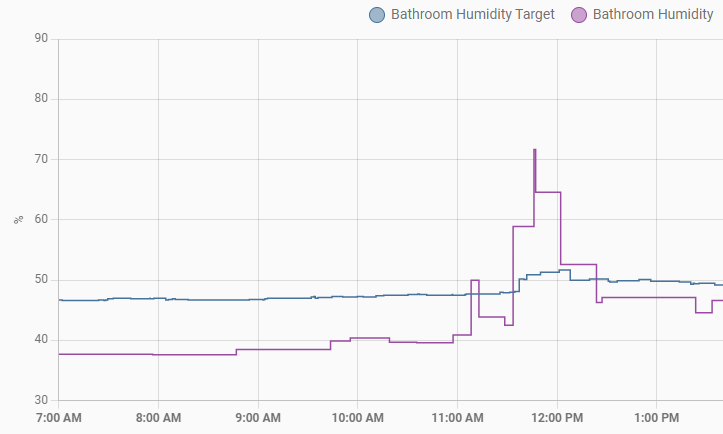
Postscript: A Simple Chart
Because Home Assistant can generate them, here's an example of real chart data for the humidity level and the target through one morning and through a shower cycle.
Recent Posts
Past Speaking Engagements
I was a speaker at MMSMOA, May 3-7, 2026!

I was a speaker at MMS Music City Edition, October 12-15, 2025!

I was a speaker at TCSMUG Autopilot/OSD Day, July 15, 2025!
![]()
I was a speaker at MMSMOA, May 4-8, 2025!
I was a speaker at BrainStorm K20 Wisconsin Dells, March 9-11, 2025!

I was a speaker at MMS Flamingo Edition, October 20-23, 2024!

I was a speaker at TCSMUG OSD Day, July 31, 2024!
![]()
I was a speaker at NWSCUG, July 19, 2024!
![]()
I was a speaker at MMSMOA, May 5-9, 2024!
I was a speaker at BrainStorm K20 Wisconsin Dells, March 10-12, 2024!
I was a speaker at MMS Miami Beach, October 29-November 1, 2023